Git 的安装与配置
1. Git 的安装
2. Git 的配置(基本)
在使用 git 之前需要使用 config 命令配置下用户名和用户邮箱:
git config --global user.name "<用户名>"
git config --global user.email "<邮箱>"
git config --global push.default simple
git config --global core.editor notepad
上面 4 个配置命令对你的电脑造成了什么「影响」?
在执行完上述的 4 个配置命令之后,你会发现你的系统的用户家目录( C:\Users\<用户名> )下会多出来一个名为 .gitconfig 的文件,打开它,你会发现其中的内容类似如下:
[user]
    email = ...
    name = ...
[core]
    editor = ...
[push]
    default = ...
这个文件就是 git 的配置文件。显而易见的是,其中的内容和你之前执行的 4 个配置命令息息相关。
3. 提前配置
3.1 全局忽略文件
后面我们在讲到通过 Git Repository 下的 .gitignore 文件添加忽略文件时,所添加的忽略配置被称为「局部忽略」配置:仅仅对 .gitignore 所在的当前 Git Repository 生效。
除了局部忽略配置之外,git 还支持「全局忽略」配置:对所有的 Git Repository 生效。
第 1 步:在你的用户的家目录(
C:\Users\<用户名>)下创建一个名为Global.gitignore的文本文件( 本质上,这个文件叫什么名字无所谓,只要保证这里叫什么名字未来配置中用什么名字就行 )。第 2 步:将如下内容添加到 Global.gitignore 中
Global.gitignore
HELP.md

### STS ###
.apt_generated
.classpath
.factorypath
.project
.settings
.springBeans
.sts4-cache

### IntelliJ IDEA ###
.idea
*.iws
*.iml
*.ipr

### NetBeans ###
/nbproject/private/
/nbbuild/
/dist/
/nbdist/
/.nb-gradle/
build/

### VS Code ###
.vscode/

### Java ###
*.class
*.log
*.ctxt
.mtj.tmp/
*.jar
*.war
*.nar
*.ear
*.zip
*.tar.gz
*.rar
hs_err_pid*
replay_pid*

### Maven ###
target/
pom.xml.tag
pom.xml.releaseBackup
pom.xml.versionsBackup
pom.xml.next
release.properties

### Node ###
logs
*.log
npm-debug.log*
yarn-debug.log*
yarn-error.log*
lerna-debug.log*
.pnpm-debug.log*
report.[0-9]*.[0-9]*.[0-9]*.[0-9]*.json
pids
*.pid
*.seed
*.pid.lock
lib-cov
coverage
*.lcov
.nyc_output
.grunt
bower_components
.lock-wscript
build/Release
node_modules/
jspm_packages/
web_modules/
*.tsbuildinfo
.npm
.eslintcache
.stylelintcache
.rpt2_cache/
.rts2_cache_cjs/
.rts2_cache_es/
.rts2_cache_umd/
.node_repl_history
*.tgz
.yarn-integrity
.env
.env.development.local
.env.test.local
.env.production.local
.env.local
.cache
.parcel-cache
.next
out
.nuxt
dist
.cache/
.vuepress/dist
.temp
.cache
.serverless/
.fusebox/
.dynamodb/
.tern-port
.vscode-test
.yarn/cache
.yarn/unplugged
.yarn/build-state.yml
.yarn/install-state.gz
.pnp.*
- 第 3 步:在 .gitconfig 中添加如下内容:
[core]
	excludesfile=~/Global.gitignore
3.2 比较工具&合并工具
在后面我们讲到 git diff 和 git merge 命令时,会通过配置,指定 VS Code 作为 git 的外部图形化工具。我们需要在 .gitconfig 配置文件中加入如下内容。
[diff]
	tool = vscode
[difftool "vscode"]
	cmd = code --wait --diff $LOCAL $REMOTE
[merge]
	tool = vscode
[mergetool "vscode"]
	keepbackup = false
	cmd = code --wait $MERGED
	trustexitcode = true
3.3 ssh-key 生成 id_rsa.pub
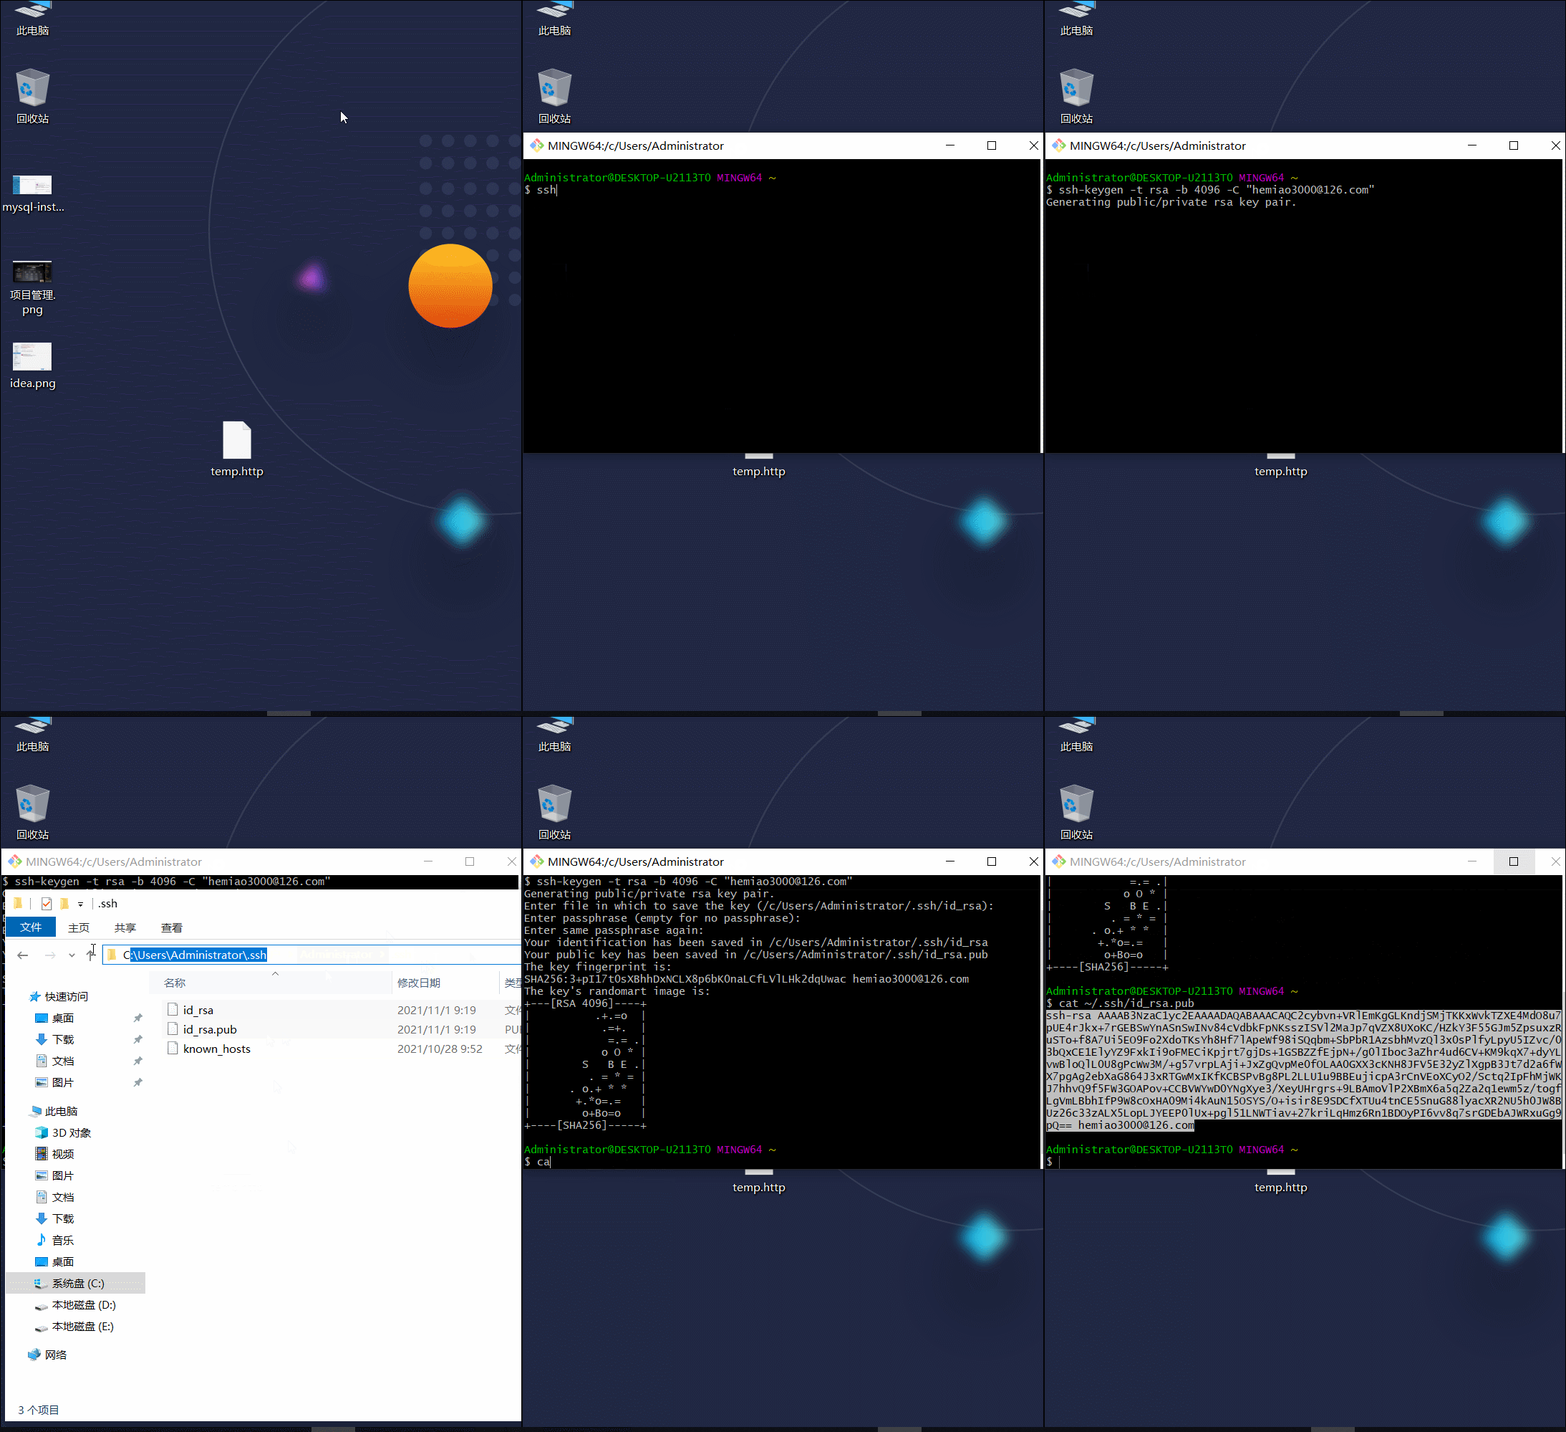
在后面我们讲到 git 的远程仓库时,会使用到 ssh-keygen 命令生成一对 SSH 公钥和私钥,并将公钥( 的内容 )暴露出去,因此,我们这里提前生成 SSH 公钥和私钥,以供未来使用。
第 1 步:查看你的用户的家目录(
C:\Users\<用户名>)有没有一个名为 .ssh 的文件夹。没有就看第 3 步;有就先看第 2 步。第 2 步:查看你的 .ssh 文件中是否有
id_rsa和id_rsa.pub两个文件。如果有,先将它俩删除,我们一会要重新生成。第 3 步:在 gitbash 命令行黑窗口执行 ssh-keygen 命令,具体内容如下。并且一路回车,直到结束。
# 理论上『备注』的内容任意。不过通常是 2 种风格:
# - 你的邮箱,例如:hemiao3000@126.com
# - username@hostname,例如:root@192.172.0.16
ssh-keygen -t rsa -b 4096 -C "<备注>"

# 一路回车、回车、回车、回车...
- 第 4 步:检查你的 .ssh 文件夹下是否重新生成、出现了
id_rsa和id_rsa.pub两个文件。
未来,我们要使用、查看的就是 id_rsa.pub 这个文件( 的内容 )。
